
Get Started with TruSync and Begin Posting Orders in 10–15 Minutes (or less)
TruSync runs right inside your store dashboard — and nothing touches QuickBooks until you've finished the guided setup.
We've designed TruSync to be easy to set up on your own — but questions come up, so we're happy to walk you through it. Schedule a demo and we can even get your store connected during the call.
1
Step 1 - Install TruSync
Installing TruSync is quick and easy. Simply locate the app in the your eCommerce platform's marketplace and click the Install button.

You will then review TruSync's access permissions

2
Step 2 - Connect QuickBooks Online
Once TruSync is installed it will launch into the QuickBooks connection wizard, a pop-up screen that will ask you to:
-
Enter your Intuit username and password then press Continue.
-
Confirm that TruSync will have permission to view your chart of accounts and enter transactions.
.avif)
3
Step 3 - Map TruSync to a QBO Customer
.avif)
TruSync allows you to map an individual customer in QuickBooks Online to prevent the addition of a new customer for every Sales Receipt or Invoice entered
Simply type a few letters into the box "Search QuickBooks Customers" and it will help you find the customer you'd like to map to in QuickBooks.
Once you have selected the appropriate customer, click the Next button to move to the next Step.
4
Step 4 - Map Your Chart of Accounts
There will be occasions where an item in your e-commerce store doesn't exist in QuickBooks and needs to be added. This step allows you to specify the accounting categories to be used to create new items, including:
-
Income Account (Sales / Revenue)
-
Deposit Account - where order totals will be deposited (usually Undeposited Funds)
-
Shipping Account - where to record income from shipping collected from Customers.
-
Discount Account - where to track discounts applied to orders.
-
COGS Account - where to record the cost of goods for items created
-
Inventory Account - where to record the inventory value of items created.
.avif)
5
Step 5 - Map Your Products
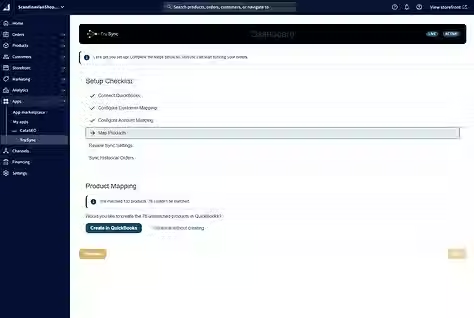
In this Step, TruSync is going to compare your product database and automatically map all possible storefront items to an item in QuickBooks Online.
For smaller product catalogs it may take a few minutes. You can click Next to move forward and you'll be notified when the mapping is complete.
You will also be prompted to manually map items that didn't map or create new items in QuickBooks, which it will do using the settings from Step 4.
6
Step 6 - Configure Your Sync
At this point you're almost finished. Just a matter of finalizing your sync settings and telling TruSync how to import orders into QuickBooks (Sales Receipts or Invoices), and how to handle refunds, cancellations, etc.
Each of these settings will play a role in maintaining accurate inventory across your different channels.
.avif)
7
Step 7 - Start Your Order Sync

The final step in the configuration process for TruSync is "turning it on", and telling it when to start its posting of orders to QuickBooks Online.
Choose a window (30, 60, 90 days) or pick a date to begin the sync from and as soon as you click "Start Backfill" orders will be imported.
Going forward, TruSync posts orders in real time. Every order that posts to QuickBooks Online adjusts its inventory — the source of truth — and that quantity updates every online store you're connected to.
We’re Here to Help
We hope this guide gets you up and running quickly — and that TruSync is already keeping your books accurate, your inventory true, and your month-end short.
If you have any questions, comments, or challenges, we’re here for you. Click the button below or use the chat in the lower right. Our goal is to help make your business more successful.

TruSync, a div. of
19 Crestwood Street
Worcester, MA 01605
(857) 777-1119
US Toll Free (844) 321-1119